HTML - Accept payments

A quick guide on how to integrate 100Pay Checkout into your HTML or Vanilla JS site.

Introduction

We're going to use our public keys for this demo. To get your public key, login into your 100Pay dashboard and click on the Settings tab, and then click on Developers Settings.

You'll notice you have two keys: Public and Private. While building your app, it's a good idea to use your public key, as this will allow you to simulate transactions.

Getting Started ๐Ÿ„ ๐Ÿš€

Create a simple form in your HTML file to collect the user's email, amount, phone number, `first name, and last name.

<!DOCTYPE html>
<html lang="en">
  <head>
    <meta charset="UTF-8" />
    <meta name="viewport" content="width=device-width, initial-scale=1.0" />
    <title>Pay with 100Pay</title>
  </head>
  <body>
    <form id="paymentForm">
      <div class="form-group">
        <label for="first-name">First Name</label>
        <input type="text" id="first-name" required />
      </div>
      <div class="form-group">
        <label for="last-name">Last Name</label>
        <input type="text" id="last-name" required />
      </div>
      <div class="form-group">
        <label for="email">Email Address</label>
        <input type="email" id="email-address" required />
      </div>
      <div class="form-group">
        <label for="phone">Phone </label>
        <input type="tel" id="phone" required />
      </div>
      <div class="form-group">
        <label for="amount">Amount</label>
        <input type="number" id="amount" required />
      </div>
      <!-- currency -->
      <div className="input-group">
        <label htmlFor="currency">Currency</label>
        <select name="currency" id="currency" required>
          <option value="USD">USD</option>
          <option value="EUR">EUR</option>
          <option value="GBP">GBP</option>
        </select>
      </div>
      <div class="form-submit">
        <button type="submit">Pay</button>
      </div>
    </form>

    <!-- Wrapper for the 100Pay checkout modal -->
    <div id="show100Pay"></div>
  </body>
</html>

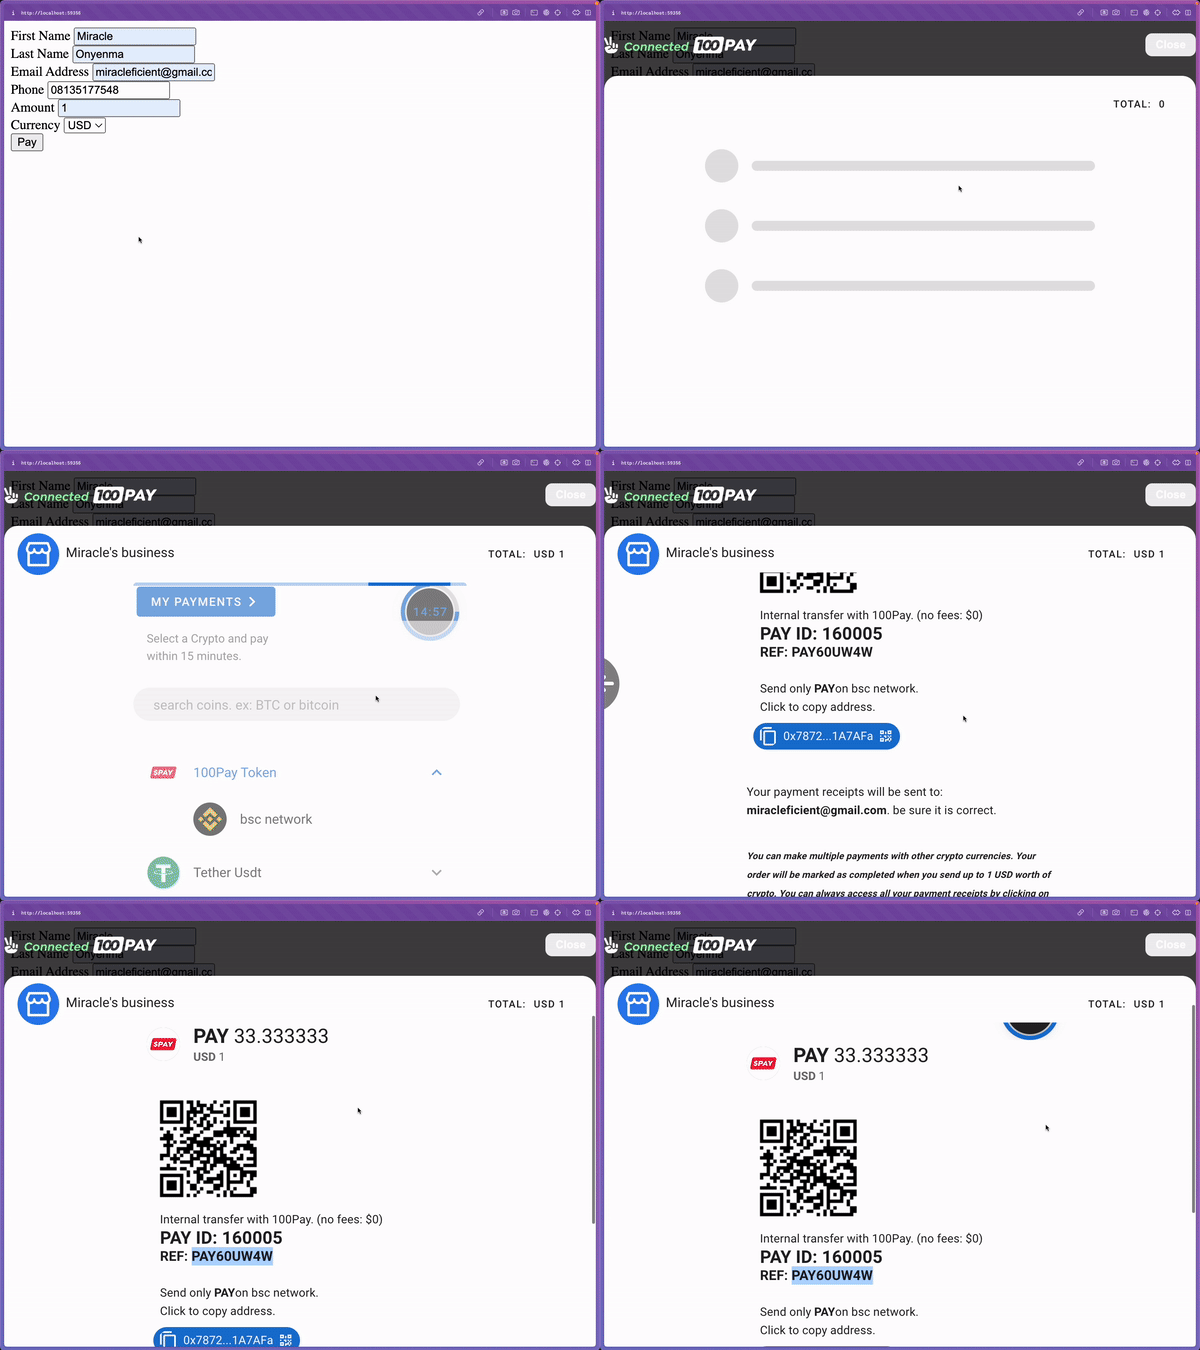
Now you should be able to see our beautiful form display in your browser! Use the form to capture user details and payment information. The form includes fields for name, email, phone, currency, and amount.

This will help streamline the checkout process on your site. Ensure all fields are correctly filled out to facilitate smooth transactions through the 100Pay Checkout API.

Install Checkout SDK

Now, import the Javascript Library to your app or add 100pay-js script tag to your website headers.

CDN
HOSTED
<script type="module" src="https://cdn.jsdelivr.net/npm/@100pay-hq/checkout/index.min.js"></script>

You can add it to your website headers:

<!DOCTYPE html>
<html lang="en">
  <head>
    <meta charset="UTF-8" />
    <meta name="viewport" content="width=device-width, initial-scale=1.0" />
    <title>Pay with 100Pay</title>
    <script type="module" src="https://cdn.jsdelivr.net/npm/@100pay-hq/checkout/index.min.js"></script>
  </head>
  <body>
    <!-- ... -->
  </body>
</html>

Javascript

But our form isn't functional yet. We need to add some logic that will submit our customer's data and initialize a transaction on 100Pay. When the user clicks on pay button, load 100pay modal.

<!DOCTYPE html>
<html lang="en">
  <head>
    <meta charset="UTF-8" />
    <meta name="viewport" content="width=device-width, initial-scale=1.0" />
    <title>Pay with 100Pay</title>
    <script
      type="module"
      src="https://cdn.jsdelivr.net/npm/@100pay-hq/checkout/index.min.js"
    ></script>
  </head>
  <body>
    <form id="paymentForm">
      <div class="form-group">
        <label for="first-name">First Name</label>
        <input type="text" id="first-name" required />
      </div>
      <div class="form-group">
        <label for="last-name">Last Name</label>
        <input type="text" id="last-name" required />
      </div>
      <div class="form-group">
        <label for="email">Email Address</label>
        <input type="email" id="email-address" required />
      </div>
      <div class="form-group">
        <label for="phone">Phone </label>
        <input type="tel" id="phone" required />
      </div>
      <div class="form-group">
        <label for="amount">Amount</label>
        <input type="number" id="amount" required />
      </div>
      <!-- currency -->
      <div className="input-group">
        <label htmlFor="currency">Currency</label>
        <select name="currency" id="currency" required>
          <option value="USD">USD</option>
          <option value="EUR">EUR</option>
          <option value="GBP">GBP</option>
        </select>
      </div>
      <div class="form-submit">
        <button type="submit">Pay</button>
      </div>
    </form>

    <!-- Wrapper for the 100Pay checkout modal -->
    <div id="show100Pay"></div>
    <script>
      // The payment form
      const paymentForm = document.getElementById("paymentForm");
      const payWith100Pay = () => {
        const email = document.getElementById("email-address").value;
        const phone = document.getElementById("phone").value;
        const amount = document.getElementById("amount").value;
        const firstName = document.getElementById("first-name").value;
        const lastName = document.getElementById("last-name").value;
        const currency = document.getElementById("currency").value;

        const publicKey =
          "LIVE;PK;eyJhbGciOiJIUzI1NiIsInR5cCI6IkpXVCJ9.eyJhcHBJZCI6IjY1ZjljZjVhZTZjNTdlMDAyZDc5NmM1NiIsInVzZXJJZCI6IjY1ZjljZjVhZTZjNTdlMDAyZDc5NmM1MiIsImlhdCI6MTcxMDg3MDM2Mn0.l-XuOcbxZWBdRAVt5Mzz1v97uRSB40K3xrrGaSHg4N0";
        shop100Pay.setup({
          ref_id: "" + Math.floor(Math.random() * 1000000000 + 1),
          api_key: publicKey,
          customer: {
            user_id: "1", // optional
            name: `${firstName} ${lastName}`,
            phone,
            email,
          },
          billing: {
            amount: amount,
            currency: currency, // or any other currency supported by 100pay
            description: "Test Payment",
            country: "US",
            vat: 10, //optional
            pricing_type: "fixed_price", // or partial
          },
          metadata: {
            is_approved: "yes",
            order_id: "OR2", // optional
            charge_ref: "REF", // optionalm, you can add more fields
          },
          call_back_url: "http://localhost:8000/verifyorder/",
          onClose: () => {
            alert("You just closed the crypto payment modal.");
          },
          onPayment: (reference) => {
            console.log(`New Payment detected with reference ${reference}`);
          },
          onError: (error) => {
            // handle your errors, mostly caused by a broken internet connection.
            console.log(error);
            alert("Sorry something went wrong please try again.");
          },
          callback: (response) => {
            console.log(response);
          },
        });
      };

      paymentForm.addEventListener("submit", (e) => {
        e.preventDefault();
        payWith100Pay();
      });
    </script>
  </body>
</html>

The form submission triggers the JavaScript logic that interacts with the 100Pay API to process a secure transaction. Here's a breakdown of how this works:

Form Selection and Submission Handler

At the start, the HTML form with the ID #paymentForm is captured by using the document.getElementById method. This form contains fields for collecting customer details, including name, email, phone number, amount, and currency.

An event listener is attached to the form's submit event. The submit event is intercepted using e.preventDefault() to prevent the default form submission behavior. Instead of reloading the page, this method ensures that the form data is processed by our custom logic, which initializes the payment using the 100Pay service.

payWith100Pay Function

The payWith100Pay function is the core of the payment processing logic. When invoked, it gathers the data entered into the form, including:

  • First Name and Last Name
  • Email Address
  • Phone Number
  • Payment Amount
  • Currency Selection

Each of these values is retrieved using document.getElementById to target the respective input fields. These form values will later be passed into the 100Pay setup function to create a valid payment request.

API Key and Transaction Setup

The publicKey constant holds the public API key for 100Pay, which is required to authenticate the request. This public key should be replaced with the actual key obtained from 100Pay for production environments.

Inside the shop100Pay.setup() function, a payment session is initialized with several important fields:

  • ref_id: A unique reference ID for the transaction is generated randomly to ensure the transaction can be tracked and identified.
  • customer: This object contains the customerโ€™s name, phone number, and email address, which were collected from the form inputs.
  • billing: The billing details include the payment amount, currency (such as USD, EUR, or GBP), a brief description ("Test Payment"), and optional fields like VAT and country. The pricing_type is set to "fixed_price", meaning the amount is predetermined.
  • metadata: Additional transaction-related information can be passed in the metadata object, such as approval status, order ID, and charge reference. These fields can be useful for backend processing or auditing.

A callback URL is also defined, which serves as the endpoint where payment confirmations or verifications will be sent after the payment is processed. This URL typically points to your server-side logic that will handle the post-payment verification.

Event Callbacks

Three primary event handlers are defined:

  • onClose: This function is triggered when the user closes the 100Pay modal without completing the payment. It alerts the user that they have exited the payment process.
  • onPayment: This callback is executed when a payment is detected and logs the payment reference for future tracking.
  • onError: In case of any errors during the payment process (e.g., network issues), this function alerts the user and logs the error for debugging purposes.
  • callback: This function logs the full response from 100Pay after the transaction is complete, providing detailed feedback on the result.

Example ๐Ÿ‘‡๐Ÿพ๐Ÿš€๐Ÿ˜ŽโœŒ๐Ÿฝ

Here's our code so far in action:

Example Preview

Conclusion

In this code block, the payWith100Pay function handles the user input and transaction setup, while shop100Pay.setup() sends the payment request to 100Pay's API. Once the payment modal is triggered, users can securely make their payment, and the appropriate callbacks will handle events like successful payment, modal closure, or errors. By intercepting the form submission and utilizing this logic, you can securely process payments with 100Pay in any web application.